Category: HubSpot CRM Setup

  • What Is a HubSpot Workflow? A Beginner’s Guide

    What Is a HubSpot Workflow? A Beginner’s Guide

    A HubSpot workflow is an automated set of actions that runs on its own when a specific trigger happens, like a form submission, a property change, or a scheduled date. Instead of a person manually sending an email or updating a record, HubSpot does it for you based on rules you set once.

    If you’re setting up HubSpot for the first time, “workflow” is one of those words that gets thrown around constantly in onboarding calls and YouTube tutorials. Nobody stops to explain it in plain terms. So let’s fix that.

    What is a HubSpot workflow, exactly?

    At the simplest level, a workflow is an “if this happens, then do that” instruction you build inside HubSpot. It’s an automated sequence of actions that you can trigger based on specific criteria, such as contact properties, behaviors, or lifecycle stages.

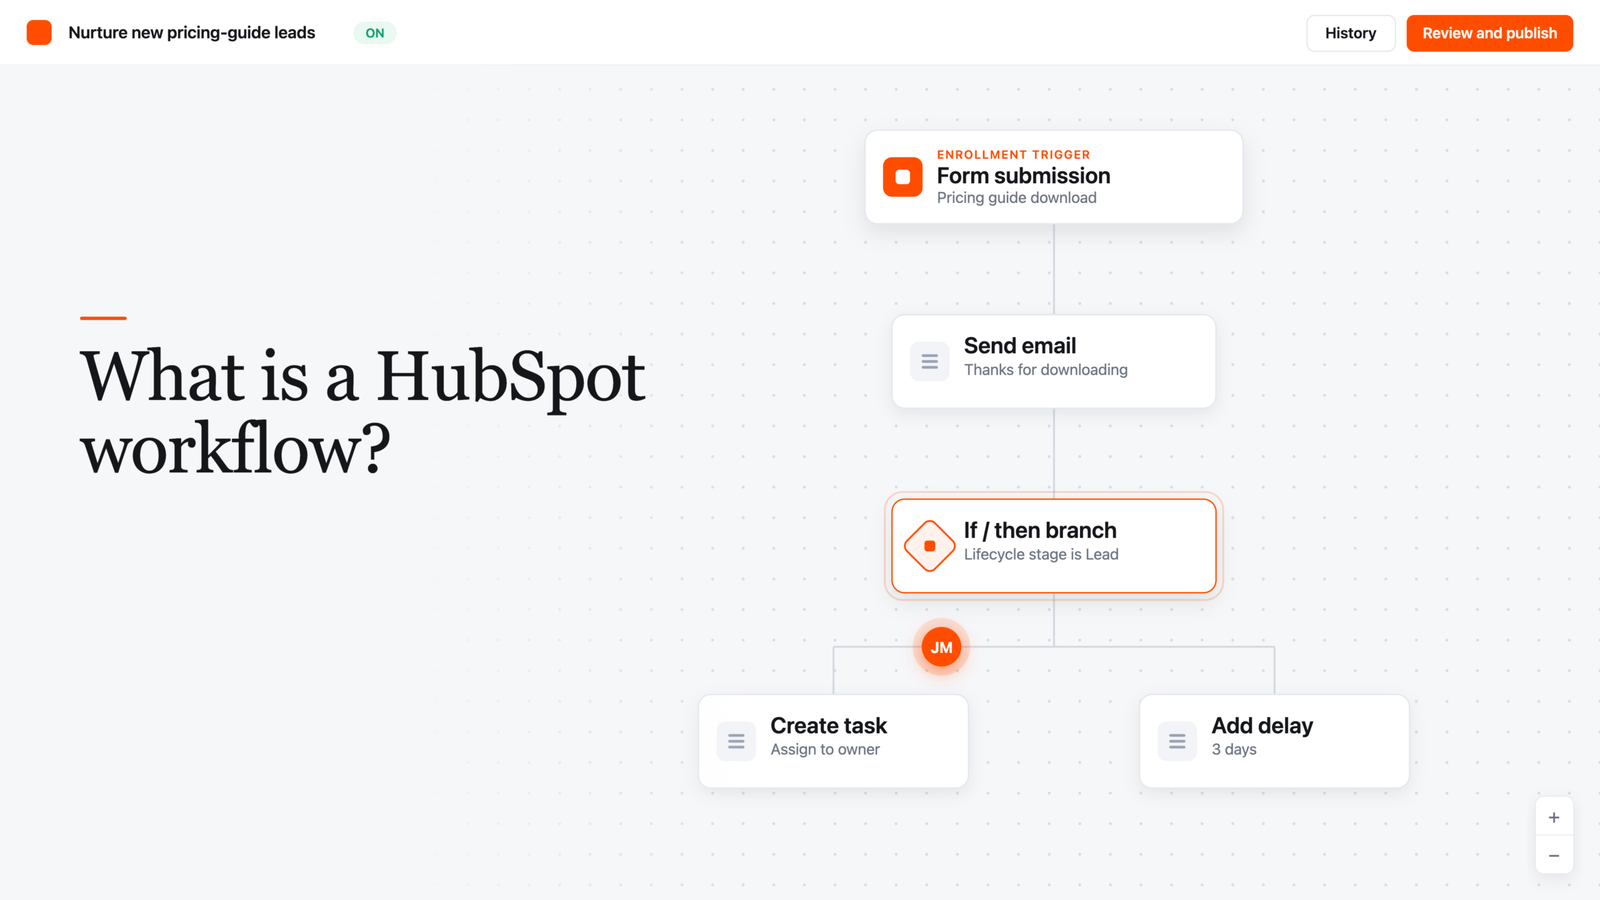
    Say a prospect fills out a form to download a pricing guide. A workflow can automatically send them a thank-you email, create a follow-up task for a sales rep, and drop them into a nurture sequence, all without anyone touching a keyboard.

    That’s the whole point. You set the logic up once, and HubSpot repeats it every single time the trigger condition is met, whether that’s once a day or a thousand times a day.

    How does a HubSpot workflow actually work?

    Every workflow has two core pieces: a trigger (HubSpot calls this an “enrollment trigger”) and a set of actions.

    The enrollment trigger decides which records get pulled into the workflow and when. There are a few different trigger types you’ll run into:

    • Event-based triggers: fire when something happens, like a form submission or a page view.
    • Filter-based (list) triggers: fire when a record matches certain criteria, like “lifecycle stage is Customer.”
    • Schedule-based triggers: run on a set frequency, such as an annual birthday email based on a contact’s birthday property.
    • Webhook triggers: enroll a record when HubSpot receives a signal from an outside tool (this one requires Data Hub Professional or Enterprise).

    Once a record (a contact, company, deal, or ticket) is enrolled, the workflow moves it through a series of actions. Those actions can send an email, update a CRM property, create a task, assign an owner, add a delay, or branch the record down a different path depending on how it answers a yes/no condition.

    Here’s the part beginners miss: workflows aren’t just for contacts. HubSpot lets you build workflows around companies, deals, tickets, quotes, and a handful of other object types, so the same logic applies whether you’re nurturing a lead or routing a support ticket to the right rep.

    Why does this matter for a growing GTM team?

    Honestly, most teams don’t get burned by a lack of workflows, they get burned by workflows nobody understands or maintains. But used well, workflows solve a real problem: manual follow-up doesn’t scale.

    When your lead volume is small, a rep can eyeball every new form fill and respond by hand. Once you’re getting dozens of leads a day across multiple channels, that falls apart fast. Workflows let you automate the qualification and distribution of leads, so high-priority prospects get attention immediately instead of sitting in an inbox.

    They’re also how HubSpot keeps CRM data from turning into a mess as you scale. A workflow can automatically update a lifecycle stage, log an activity, or flag a record for cleanup the moment a condition is met, instead of relying on someone to remember to do it.

    Workflows vs. sequences: what’s the difference?

    This trips up a lot of new HubSpot users, so it’s worth a quick clarification. Sequences are built for one-to-one sales outreach: a rep enrolls a specific contact into a series of personalized emails and task reminders, and it’s designed to preserve a human touch.

    Workflows are the fully automated version that runs across marketing, sales, and service at scale, updating properties, assigning tasks, routing tickets, and handling branching logic without a rep manually enrolling each record. If a sequence is a rep working a list by hand with some automation assist, a workflow is the machine running in the background regardless of who’s watching it.

    What HubSpot plan do you need for workflows?

    This is where a lot of people get tripped up during setup, and it’s worth checking before you build your first one. The full workflow builder, with branching logic and multi-step automation, is a Professional and Enterprise tier feature. Starter subscriptions only include simple, single-step automations in specific tools like forms, not the full drag-and-drop workflow editor.

    If you’re still figuring out which HubSpot tier your team actually needs, it’s worth reading through HubSpot Free vs. Starter vs. Professional: Which Tier Do You Actually Need? before you commit to a plan based on workflow access alone.

    A simple checklist before you build your first workflow

    Pro tip: don’t open the workflow builder until you can answer these questions on paper. A workflow built without a clear trigger and end state is how you end up with duplicate emails and confused prospects.

    1. What specific event or condition should start this workflow? (Form fill, property change, date, list membership.)
    2. Which record type does it apply to? (Contact, company, deal, ticket.)
    3. What should happen, step by step, once a record enrolls?
    4. Should records be allowed to re-enroll, or only run through once?
    5. What condition should remove a record from the workflow early?
    6. Who on your team needs to be notified if something breaks?

    Getting these six answers down before you touch the builder will save you from the classic beginner mistake: building a workflow that technically runs, but does the wrong thing to the wrong people.

    FAQ

    Is a HubSpot workflow the same as an automation?
    Pretty much, yes. “Workflow” is just HubSpot’s specific name for its automation tool. Other platforms might call the same concept a “flow” or an “automation recipe,” but the underlying idea (trigger plus actions) is the same.

    Can I use workflows on HubSpot’s free plan?
    No. The full workflow builder requires Marketing Hub, Sales Hub, Service Hub, or Operations Hub Professional or Enterprise. Free and Starter accounts get simple, single-action automations in specific tools, not the visual multi-step builder.

    Do workflows only send emails?
    No, and this is a common misconception. While email automation is the most visible use case, workflows can also update CRM records, create internal tasks, notify team members, route support tickets, and connect to external systems through webhooks and integrations.

    What happens if a contact meets a workflow’s trigger twice?
    It depends on your re-enrollment setting. You can configure whether a record re-enrolls each time it meets the trigger criteria again, or only runs through the workflow once, ever.

    Do I need coding skills to build a workflow?
    No. Workflows are built through a visual, drag-and-drop editor that lets you set up branching “if this, then that” logic without writing code. HubSpot has also added an AI assistant that can suggest triggers and actions based on a plain-language prompt.
  • HubSpot Free vs. Starter vs. Professional: Which Tier?

    HubSpot Free vs. Starter vs. Professional: Which Tier?

    HubSpot Free vs. Starter vs. Professional: Which Tier Do You Actually Need?

    If you’ve spent any time on HubSpot’s pricing page, you know the feeling. Three tiers, a handful of “Hubs,” per-seat math, and a nagging suspicion that you’re either about to overpay or about to get stuck two months in.

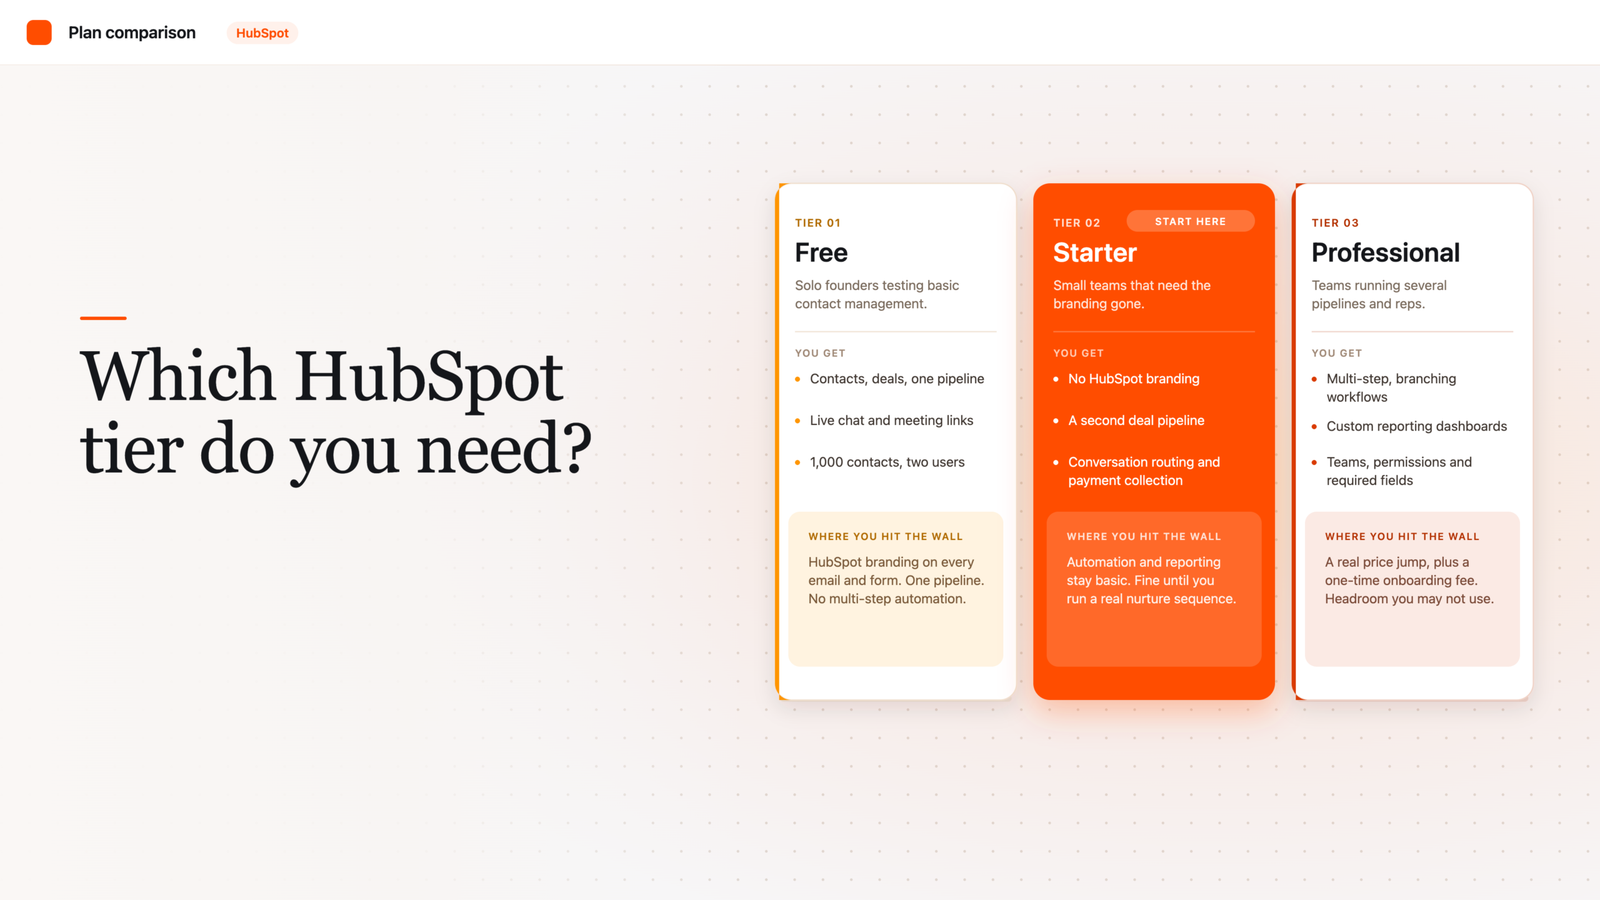
    HubSpot Free works for solo founders testing basic contact management. Starter (around $20/seat/month) fits small teams that need automation basics and no branding. Professional ($100+/seat or $890/month for Marketing Hub) suits teams that need multi-step automation, custom reporting, and multiple pipelines.

    That’s the short version. But the real answer depends on where your team actually gets stuck day to day, not on some abstract “company size” bracket. Let’s walk through what each tier really includes, so you’re not guessing.

    What’s actually different between the three tiers?

    A “tier” in HubSpot just means a package of features tied to a price point. You can mix tiers across different Hubs (Marketing, Sales, Service, Content, Operations), which is part of why the pricing page feels confusing.

    At a high level: Free gets you in the door with core CRM functionality. HubSpot’s free CRM includes up to two users and 1,000 contacts, with no limits on how long you can use it and no expiration date. Starter removes HubSpot’s branding from your emails and forms and adds early automation. Professional is where real workflow automation, custom reporting, and team management features live.

    What do you actually get with HubSpot Free?

    Free is a genuinely usable CRM (a system for tracking your contacts, companies, and deals in one place), not just a stripped-down demo. You get contact and deal records, basic pipeline tracking, live chat, and meeting scheduling at no cost.

    But it has real ceilings. You’re capped at two users and 1,000 contacts. You only get one deal pipeline (the stages a deal moves through, like “Prospect” to “Closed Won”), so if you run more than one sales process, say new business versus renewals, you’re already boxed in. There’s also no multi-step workflow automation on Free; you can trigger a single follow-up email off a form fill, but you can’t build a branching sequence.

    Every outward-facing piece of Free, your emails, forms, chat widget, and meeting links, carries HubSpot’s branding. For a two-person team testing the waters, that’s a non-issue. For a team fielding client questions about “what CRM are you using,” it starts to feel unprofessional.

    What does Starter add?

    Starter is priced around $20 per seat per month and is really the first “real” paid tier. It removes HubSpot’s branding and unlocks a second deal pipeline, so you can finally separate two different sales motions.

    On the sales side specifically, Starter adds conversation routing (automatically directing incoming chats or emails to the right rep), built-in payment collection, unlimited email notifications, and a set amount of calling minutes per account each month. It also introduces custom properties and task queues, small but meaningful upgrades if your team has outgrown default fields.

    Honestly, Starter is the tier most early-stage teams should be evaluating first, not Free and not Professional. It’s cheap enough to try without a real budget conversation, and it removes the two limitations (branding and single pipeline) that trip people up fastest.

    What does Professional unlock?

    This is where the price jump gets real. Sales Hub Professional runs about $100 per seat per month, while Marketing Hub Professional starts closer to $890 per month. Professional tiers also typically carry a one-time onboarding fee, roughly $1,500 for Professional plans, separate from your monthly subscription.

    What do you actually get for that? Multiple deal pipelines with more flexibility, required fields (so reps can’t skip critical data entry), Teams (for organizing larger sales orgs with permissions), advanced views, and significantly more calling minutes per rep each month. Professional also connects to Salesforce if you’re running a hybrid stack, and it’s the tier where custom reporting and true multi-step automation live.

    Here’s the honest take: most teams don’t actually need Professional because of one flashy feature. They need it because Starter’s automation and reporting genuinely can’t support a sales or marketing motion with more than a couple of pipelines and reps. If that’s not you yet, you’re paying for headroom you won’t use for a year.

    A quick self-check: which tier do you need?

    Run through these questions before you commit to a plan:

    1. How many people need CRM access today? More than two, and Free is already off the table.
    2. Do you run more than one sales or marketing process? If yes, you need at least Starter’s second pipeline.
    3. Does your team need multi-step automation (like a five-email nurture sequence triggered by behavior, not just one follow-up)? That’s a Professional-level need.
    4. Do you need custom reporting dashboards for leadership, not just default views? Professional territory.
    5. Is branding on your customer-facing emails and forms a dealbreaker? If yes, skip Free entirely.
    6. Can you absorb a one-time onboarding fee on top of monthly seats? If not, stay on Starter until you can.

    Pro tip: don’t buy Professional across every Hub at once just because you need it in one. Most teams only need Professional-level automation in Sales or Marketing, not both, at least in year one. Buying it everywhere just because the bundle looks tidy is how budgets balloon.

    FAQ

    Is HubSpot’s free CRM actually free forever, or is it a trial?
    It’s genuinely free forever, no expiration date and no credit card required for the core CRM. The catch is the two-user and 1,000-contact caps, not a hidden time limit.

    Can I mix tiers across different HubSpot Hubs?
    Yes. You could run Sales Hub Professional while staying on Marketing Hub Starter, and plenty of teams do exactly that to control cost.

    Does upgrading from Starter to Professional include onboarding help?
    Professional plans typically carry a one-time onboarding fee separate from your monthly subscription. That fee covers setup support, but it’s mandatory in most cases, not optional white-glove service.

    What’s the single biggest reason teams outgrow Starter?
    Automation. Starter gives you light, single-step automation, but the moment you need branching workflows based on contact behavior, you’re looking at Professional.

    Should a two-person startup ever start on Professional?
    Rarely. If you’re testing a motion, not scaling one, Free or Starter almost always makes more sense until your process is proven.


  • HubSpot Lifecycle Stages Explained: A Beginner’s Guide

    HubSpot Lifecycle Stages Explained: A Beginner’s Guide

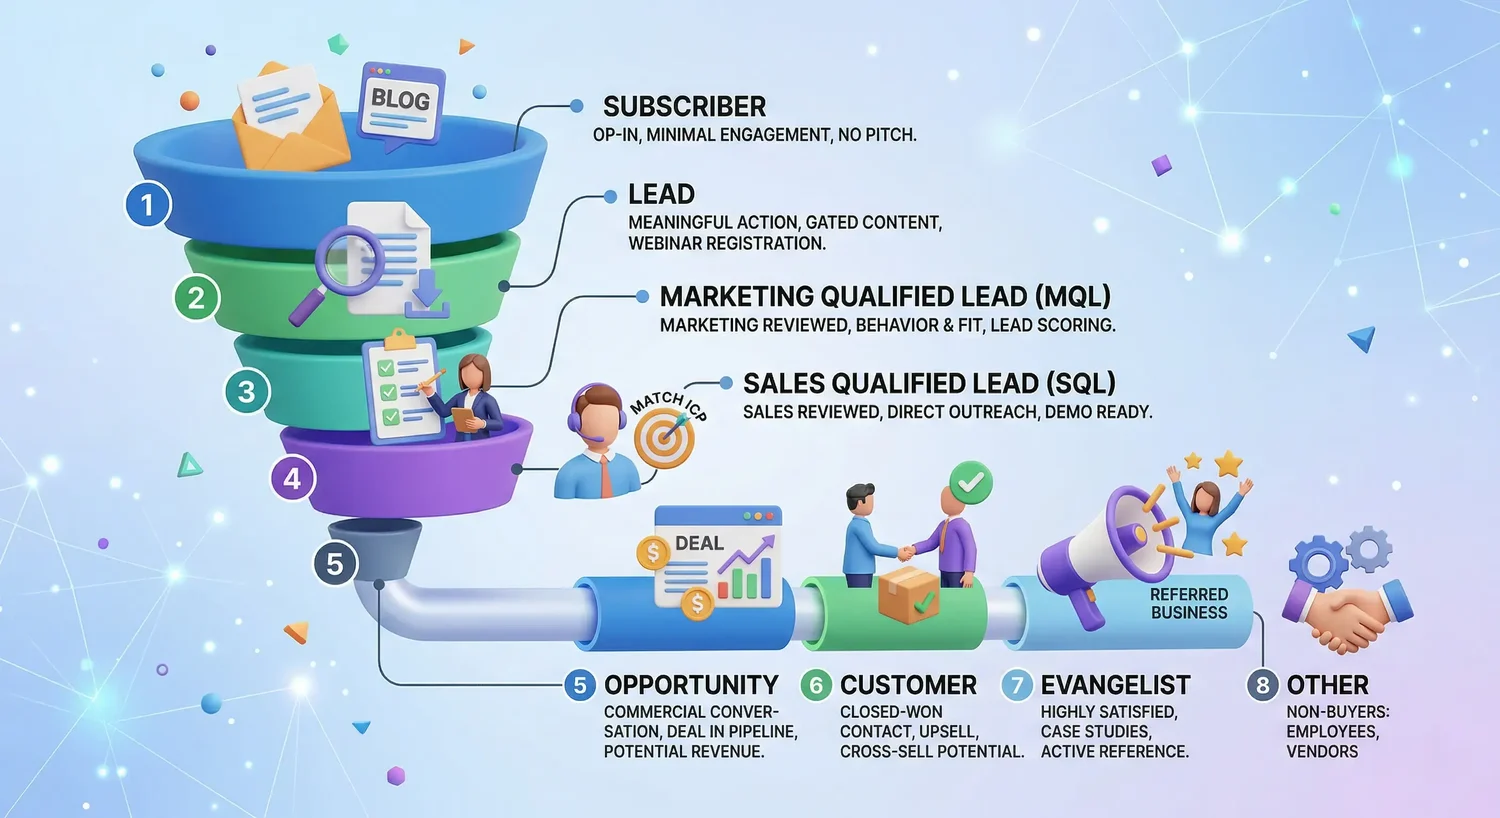
    HubSpot lifecycle stages are a CRM property that shows where each contact sits in your customer journey, from first contact to loyal customer. HubSpot ships with eight default stages: Subscriber, Lead, MQL, SQL, Opportunity, Customer, Evangelist, and Other, and you can customize them to match your sales process.

    If you’ve just logged into HubSpot for the first time, you’ve probably noticed a property called “Lifecycle Stage” sitting on every contact record. It’s easy to skim past it. Don’t.

    This one property quietly powers a lot of what makes HubSpot useful: your workflows, your funnel reports, and the handoff between marketing and sales. Get it wrong (or ignore it) and your reporting turns into guesswork. Get it right and everyone on your team can answer the same question the same way: where is this person in their journey with us, and what should happen next?

    What Is a HubSpot Lifecycle Stage, Exactly?

    The Lifecycle Stage property is a native field in HubSpot that tracks where a contact or company sits in your customer journey, starting from the first time you interact with them and continuing through purchase and beyond. Every single contact and company record in your HubSpot account carries this property, whether you’ve configured it or not.

    Think of it as a label that answers one question for your whole team: what milestone has this person actually crossed? It’s not meant to track daily busywork. It’s meant to mark the big, meaningful transitions in a relationship, like when someone stops being an anonymous website visitor and becomes a real sales opportunity.

    Properly configured lifecycle stages aren’t just cosmetic labels. They let your team segment contacts, personalize outreach, trigger automated workflows, and build pipeline reports that actually mean something. Skip the setup work and lifecycle stages become metadata that nobody trusts, not intelligence you can act on.

    The 8 Default HubSpot Lifecycle Stages Explained

    Out of the box, HubSpot gives you eight stages: Subscriber (opted into your communications, no buying intent yet), Lead (took a meaningful engagement action), MQL (marketing has qualified them as sales-ready), SQL (sales has verified them against your ideal customer profile), Opportunity (there’s a formal deal with a dollar value attached), Customer (closed-won), Evangelist (an active referral source or case study participant), and Other (for contacts who will never be customers, like vendors or job applicants).

    Here’s what each one actually means in practice.

    Subscriber. Someone who opted in to hear from you but hasn’t shown any real purchase intent yet. Newsletter signups, blog subscribers, and podcast registrants typically land here. Don’t try to sell to this group. Nurture them with useful content instead.

    Lead. A contact who has expressed some interest by filling out a form or downloading a resource. They’ve identified themselves, but they haven’t yet met your bar for marketing qualification.

    Marketing Qualified Lead (MQL). A contact who meets the behavioral and fit criteria your team defined as “ready for sales outreach.” Here’s the catch: there’s no universally agreed definition of MQL across companies, and HubSpot doesn’t apply this stage automatically. Most teams treat an MQL as someone marketing is comfortable handing to sales.

    Sales Qualified Lead (SQL). This is where a sales rep has personally made contact and confirmed the lead is worth pursuing. Some teams formalize this with BANT criteria (Budget, Authority, Need, and Timeline) before moving someone into SQL. Like MQL, HubSpot leaves the exact definition up to you.

    Opportunity. By default, HubSpot automatically applies this stage the moment an associated deal record gets created. You can also apply it manually if you want to flag someone as an opportunity before a deal exists.

    Customer. Once a deal tied to that contact gets marked Closed Won, HubSpot moves the contact to Customer automatically.

    Evangelist. Reserved for customers who’ve moved past satisfaction into advocacy: think referrals, testimonials, or case study participation. This and Customer both sit in what’s often called the retention or advocacy phase of the journey.

    Other. A catch-all for contacts who will never become customers, regardless of stage.

    Lifecycle Stage vs. Lead Status: What’s the Difference?

    This trips up nearly every new HubSpot admin. Lifecycle Stage answers “where is this person in the overall journey?” Lead Status answers a narrower question: “what’s happening with them right now, today, within that stage?”

    For example, a contact moving from Lead to MQL is a lifecycle stage change. Whether that same MQL has been “Attempted to Contact” or is “In Progress” with a rep is a lead status change. Mixing the two up is one of the most common reasons HubSpot reporting ends up unreliable. Lifecycle Stage should track milestones, not your rep’s daily to-do list.

    Can a Contact Move Backward in Lifecycle Stage?

    Not automatically, no. HubSpot’s built-in lifecycle stage automation is designed to move contacts forward, not backward, so a closed-lost deal won’t quietly demote someone from Opportunity back to Lead on its own. If you want that kind of downgrade to happen, a rep has to do it manually, or you need to build a workflow specifically for it.

    Honestly, most teams never bother building that backward workflow, and their reporting suffers for it. If your “Opportunity” count is padded with dead deals from six months ago, nobody trusts the funnel numbers anymore. Worth fixing early rather than discovering it during a board meeting.

    Should You Customize the Default Stages?

    Probably, eventually, but not on day one. Custom lifecycle stages make sense when your actual sales process has a distinct step the defaults just don’t capture, like a formal technical evaluation or a pre-renewal check-in. The tradeoff is real: too many custom stages make the CRM harder to manage and explain to new hires.

    A reasonable starting point most consultants agree on: keep Lead, Opportunity, and Customer as HubSpot defines them, since those map cleanly to almost any business. Don’t feel obligated to force Subscriber, MQL, SQL, or Evangelist into your process if they don’t fit your motion. You can always add them back later.

    Pro tip: before you touch any stage settings, write down a one-sentence definition for MQL and SQL that both marketing and sales sign off on. Verbal agreements that each team interprets differently are one of the most common causes of marketing-sales misalignment, and it’s a lot cheaper to fix on a whiteboard than inside a broken workflow.

    A Quick Checklist for Setting Up Lifecycle Stages

    1. Go to Settings, then Objects, then Contacts in your HubSpot navigation.
    2. Click the Lifecycle Stage tab to see your default stages listed in order.
    3. Write a one-sentence, specific definition for every stage, especially MQL and SQL.
    4. Get sign-off from both marketing and sales leadership on those definitions.
    5. Decide which default stages you’ll actually use and turn off or delete the rest.
    6. Add custom stages only for distinct steps your process genuinely needs.
    7. Build (or confirm) the workflow that moves Closed Won deals to the Customer stage.
    8. Set up a funnel report so you can watch conversion rates between stages monthly.

    One useful sanity check once you’re live: for a mid-market B2B company, a reasonably healthy funnel might look something like 100,000 Subscribers narrowing down to 20,000 Leads, 2,000 MQLs, 600 SQLs, 400 Opportunities, and 120 new Customers in a quarter. If the ratio between any two adjacent stages looks inverted, like more SQLs than MQLs, that’s usually a data problem, not a sign you’re crushing it.

    FAQ

    Do I have to use all eight default lifecycle stages?
    No. Plenty of companies skip Subscriber, Evangelist, or Other entirely because those stages don’t map to how they actually sell.

    What triggers HubSpot to move a contact to Customer automatically?
    HubSpot moves a contact to Customer once a deal associated with them is marked Closed Won.

    Is MQL the same across every company?
    Not even close. There’s no universal definition of MQL, and HubSpot doesn’t apply it automatically, which is exactly why your marketing and sales teams need to agree on your own criteria in writing.

    Can a lifecycle stage move backward if a deal falls through?
    Not on its own. HubSpot’s default automation only moves stages forward, so you’d need a manual update or a custom workflow to send a contact back down the funnel.

    What’s the difference between Lifecycle Stage and Lead Status?
    Lifecycle Stage tracks big-picture milestones in the customer journey. Lead Status tracks the day-to-day activity happening inside a single stage, like whether a rep has reached out yet.

  • 7 HubSpot Setup Mistakes New Admins Make and Fixes

    7 HubSpot Setup Mistakes New Admins Make and Fixes

    New HubSpot admins usually break the same seven things: dirty data imports, default pipelines, unchecked property growth, over-permissioned users, unmanaged duplicates, automation built before process mapping, and no post-launch training owner. Each one looks harmless at launch and gets expensive within a year.

    If you just got handed the keys to your company’s HubSpot portal, welcome. It’s a genuinely capable platform. It’s also very easy to configure in a way that looks fine for the first few months and then quietly falls apart.

    Here’s the thing: HubSpot won’t stop you from making these mistakes. It’s flexible by design, which means it lets you build pipelines, properties, and workflows that don’t match how your business actually sells. The platform doesn’t know your sales process. You have to tell it, and if you don’t, it defaults to something generic.

    Below are the seven mistakes we see most often in new admin setups, and what to do instead.

    1. Migrating data in before cleaning it up

    A CRM (customer relationship management system, the database that tracks your contacts, companies, and deals) is only as good as what goes into it. Importing years of messy spreadsheet exports on day one means you’re building your entire setup on a shaky foundation. The setup mistakes that hurt you later rarely break anything on launch day. Property sprawl, workflow spaghetti, skipped integration planning, and dirty data imports all look harmless at launch and expensive twelve months in.

    Before you import anything, dedupe your source files, standardize how company names and email domains are formatted, and decide what counts as a “complete” record. It’s tedious. Do it anyway.

    2. Leaving pipeline and lifecycle stages on default settings

    HubSpot ships with a generic deal pipeline and a standard lifecycle stage list (the stages a contact moves through, like Lead, Marketing Qualified Lead, and Customer). Most new admins never touch them, and that’s a problem, because the default pipeline has deal stages that are generally applicable but may not reflect the specific steps in a company’s sales process.

    Lifecycle stages cause even more pain. Teams configure the stages in the first month, leave the definitions vague, update them manually when they remember, and then wonder why funnel reporting is unreliable. One industry analysis found that a large majority of companies struggle with lifecycle stage accuracy, and when that happens, it quietly sabotages lead scoring, reporting, and automation across the whole portal.

    Write down, in plain language, what makes a contact a Lead versus an MQL versus a Customer at your company specifically. Then automate the stage changes with workflows instead of relying on reps to update them by hand, since manually changing lifecycle stages means you miss the timestamp HubSpot needs for accurate reporting.

    Pro tip: keep lifecycle stage moves forward-only for reporting purposes. If a deal stalls or a lead goes cold, use a status field to flag it rather than reverting the lifecycle stage backward, so you don’t lose the historical record of how that contact actually moved through your funnel.

    3. Letting properties multiply without any oversight

    A property is just a field on a record, like “Job Title” or “Deal Amount.” New admins tend to add one every time someone asks for a new way to slice data, and nobody ever removes the old ones. One analysis of live portals found that most HubSpot portals carry 30 to 50 percent unused custom properties, fields that exist but aren’t tied to any workflow, list, or report.

    Honestly, most property sprawl problems aren’t a HubSpot limitation, they’re a governance gap. Nobody owns the decision to say no to a new field.

    The fix is simple: require a quick justification before anyone creates a new property, and review unused ones on a regular cadence. That one habit alone can cut sprawl dramatically. If you’re on Operations Hub Professional or higher, HubSpot’s data quality command center will flag properties with no data, duplicate properties, and properties nobody’s using, which makes the review much faster.

    4. Making everyone a Super Admin

    Super Admin is the highest access level in HubSpot. It gives someone the ability to remove integrations, alter workflows, and change billing information for the entire account. New admins often hand this out freely because it’s the path of least resistance when someone asks for access.

    Don’t do this. Every portal needs at least one Super Admin, but piling on more than a couple creates unnecessary risk of accidental changes and data issues. The better approach is the principle of least privilege: give each person only the access their job actually requires, and expand it later if a real need shows up. Start with essential permissions only, then expand access if it’s truly necessary, rather than the other way around.

    5. Having no plan for duplicate records

    Duplicates creep in from form fills, manual entry, and messy imports, and they cause real damage: reps waste time contacting the same lead twice, workflows send duplicate emails or skip people entirely, and you can’t trust your pipeline totals or conversion rates.

    The best fix is prevention, not cleanup. Use domain-based company matching instead of relying on company names, enforce duplicate checks during imports, and get reps in the habit of searching for existing records before creating new ones. Even with good prevention, assign someone to review the duplicates tool on a regular schedule, because no strategy stops every duplicate from slipping through.

    6. Building automation before mapping the actual process

    Workflows (HubSpot’s automation tool) are one of the platform’s best features, and one of the most common sources of chaos in a new setup. Automation built without planning becomes one of the biggest problems, with workflows triggering each other, sending content to the wrong segments, and disrupting the experience for both reps and prospects.

    The root cause is usually the same: teams build around what HubSpot can technically do rather than how the business actually sells, markets, and serves customers. Map your process on a whiteboard first. Build the automation second.

    7. Skipping ownership for training and upkeep

    A setup that looks complete on launch day can still fail quietly over the following months if nobody owns it. Good setup weakens quickly when nobody owns onboarding after launch, and the same applies to integrations: review which systems connect to HubSpot, what data syncs, and how sync failures get caught, because unmonitored integrations create silent reporting errors down the line.

    Someone on your team, even part-time, needs to own the portal after go-live: training new hires, watching for data drift, and keeping documentation current.

    A quick pre-launch checklist

    1. Clean and standardize source data before any import
    2. Rebuild pipeline and lifecycle stages around your actual sales process, in writing
    3. Set a property-approval habit before you add new fields
    4. Audit who has Super Admin and cut it down to a small, trusted group
    5. Turn on duplicate-prevention rules and schedule a recurring duplicate review
    6. Map your process before building any workflow
    7. Name a permanent owner for training, documentation, and ongoing hygiene

    FAQ

    How long does a proper HubSpot setup take?
    A standard implementation typically takes four to six weeks, and multi-hub or migration-heavy projects can run six to eight weeks depending on how complex your data is.

    Can I fix these mistakes after HubSpot is already live?
    Yes, and most companies do. None of these problems requires starting from scratch, but fixing them does require an honest look at where the gaps actually are.

    Do I need a HubSpot partner, or can I set it up myself?
    It depends on your team’s shape more than your budget. A single admin with a simple, single-pipeline sales process can reasonably DIY a Starter or Sales Hub setup, but a business with multiple systems, a dedicated RevOps function, or CRM migration involved can lose months to a DIY build that a partner would get right the first time.

    What’s the single biggest mistake on this list?
    Data hygiene problems, because they’re foundational. Bad data quietly undermines everything else you build in the portal, including pipelines, workflows, and reporting.

    How many Super Admins should a portal actually have?
    Keep it small. Assign Super Admin access only to people responsible for system-wide decisions, and use scoped permission sets for everyone else.

    If you’re staring at a portal that already has a few of these problems (or all seven), it’s usually faster to get a second set of eyes on it than to guess your way through a fix. Book a free HubSpot setup diagnostic call with Revlyn and we’ll walk through your portal together and tell you exactly what to fix first.